DIY Halogen Bike Light – Your step by step guide
DIY Halogen Bike Light – Part 1 (Parts & Tools)
This 2 part DIY Halogen Bike Light series is easy to follow and I guarantee it will save you $$$. Lights are relatively simple things, but a quality set can cost you big. If you want to have a go at night riding or need something to get you home safe at the end of a long day, then why not try a little DIY and make your own bike lights?
Part 1 looks at the parts and tools you need to make your very own bike lights. They may not look quite as professional as a $300 set however you will save money! You only need limited experience and there isn’t any soldering, so lets get started…
DIY Halogen Bike Light Parts
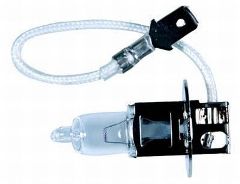
Globes (2) – 12V, 20W, 12 degree (ESX) halogen downlights with glass lens covers. Make sure you get a good set and stick with well known brand like EYE, Thorn, Philips or GE. A decent pair will put out more light than a cheap one. Price: $6-7 each

Halogen Bike Light Globe with Connector
Ceramic Clip connectors (2) – Price: $3-4 each
Connectors (2) – for joining 2 wires into 1. I found Posi-lock™ no-crimp connectors to work very well. Price: $5

Hose Clamps (2) – 14 – 27mm stainless steel. Price: $3.25
Hose Clamps (2) – 8 – 22mm stainless steel. Price: $3.25
Spade Connectors (7 female, 1 male) – Price: $2.20 (for a pack of 8)

Wire – 3 metres of 4 amp. If you get double core wire (2 wires joined together side-by-side) it is neater and easier for your bike. Price: from $0.65 per metre
Battery – cost will depend on capacity and type. Sealed lead acid (SLA – also known as gel cells) are cheaper but heavier than NiCads. Price: $25 – 50 (7ah SLA)
————–SIDEBAR——————-
 To work out the battery power needs for your DIY halogen bike lights, do the following: Calculate your current (amps) by dividing power (Watts) by voltage. So one 12V, 20W globe will draw 1.66amps, 2 globes will draw 3.33amps. Then derate your battery by about 20% for high current draw and another 20% for very cold operation (like at night).
Thus our 7ah battery will become 5.6ah when derated for current and 4.5ah in the cold. Continuous operation of 1 globe (1.66amps) will drain a 7ah battery in a bit over 2.5hours, and 1.5 hours for a 4ah. Running 2 globes (3.33amps) will give you less than 2 hours for a 7ah battery.
————–SIDEBAR——————-
Battery Charger – Whatever suits your fancy. Price: from $20
Battery Mount – Here is your chance to be creative. You could use a modified bottle cage, securing the battery to the cage and frame with an old motorbike battery strap and zip ties. Or maybe you would prefer to use a rack, backpack or bumbag. The disadvantage of bags is that you are connected to the bike until you disconnect the battery. Remember that the closer the battery is to you bike’s centre of gravity, the less it will effect handling. Price: $0.00 to $lots

Rubber Strips – Cut these from an old inner tube. Price: $0.00
Slimline rocker switches (2) – male spade connectors. Price: $2.25 each
Switch Mounts (2) – make these from clamps, tape, zip ties and whatever else you can think of. Price:
Heat Resistant Paint – The globe housing will get too hot for ordinary paint (I recommend black – it looks the best).Price: $7.50
Fuse link and fuse – Whilst recommended they are not actually essential. Price: from $1
Electrical Tape – Price: $0.90
TOTAL PRICE:
Tools
- Wire stripper/crimping tool (or pliers and Stanley knife)
- Flat head screwdriver
- Wet and dry sandpaper
- …yep that’s it!
Now that you know what parts and tools you need for your DIY halogen bike light, lets get down to the nitty gritty and put it all together…

