Mountain Bike Forks – Installing Mountain Bike Forks in 10 Simple Steps
Installing mountain bike forks is often left to professionals. However if you do a little bit of your own bike maintenance, you can do it too! Here I will show you in 10 easy-to-follow steps, how to replace a mountain bike fork.
While there are some specialist and often costly tools on the market to make this job easier, with a little know-how, this job can be done with the tools most bikers will already have in their collection.
Right lets get started…
01 :: Disassembly

The 1st step is to remove the brakes and undo your stem top cap. You don’t have to remove your bars.
02 :: Remove Stem
The next step is to slide the stem up the steerer. Releasing your brakes and popping your gear cables may help you to do this without fouling anything. You can pop your gear cables by shifting your derailleurs into their highest settings and then clicking the shifters all the way down without moving your chain.
Keep your hand under the brake bridge so your fork doesn’t fall out.

03 :: Collect Spacers
It is now time to slide your fork out. There will (most likely) be a bunch of spacers at the top of your fork. As you slide your fork out make sure you collect them and remember what order and orientation they came off in.

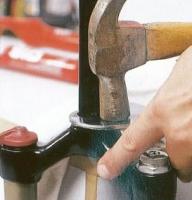
04 :: Remove the Crown
The fork you have just removed has the lower crown race of the headset on it and you will need this part for your new fork. It may pay to get a specialist tool for this job, however if you don’t it can still be removed with a whole lot of patience and care.
The best method to remove it is to use a small thin flathead screwdriver you don’t mind damaging and a hammer. Most modern mountain bike forks are reasonably co-operative when it comes to crown installation and removal, but if you have an older fork they can be a fair bit more difficult.
05 :: Install the Crown
With the crown removed, you need to install it onto your new mountain bike fork. Start off by gently filing out an nicks on the inside surface of the race. Then wipe a finger with grease on it around the base of the steerer. Next slide on the crown race and tap it down gently with a 36mm headset wrench, or a similar flat wrench, covered in a rag.
Park Tools have a specialist tool for the application which will make the job easier. Another alternative is to use a pipe that can slide over the steerer and sit on the crown.
06 :: Measure the Length
The nest step is to work out how long your steerer tube needs to be. This can be easily done by measuring your old one and marking it on your new one. Just remember to measure twice (or 3 or 4 times) and cut once.

07 :: Cut the Steerer
While it is possible to cut your steerer to length with a hack saw it is not recommended! By far the best method is to cut it with some pipe cutters. You will find nearly all alloy steerers easy to cut. Add a little dry lube on the cutting area to make it even easier.
If your new mountain bike fork is steel, then you will need a good quality pipe cutter. A hack saw can do the job but I wouldn’t trust myself to do it – you really need someone who knows what they are doing and can make a good cut.
It is a good idea to cut a mountain bike forks a little longer, so you can install some spacers under the stem.

08 :: Install the Star Nut
This is one of the trickier steps to complete. You should get your nut in your new fork box. If you didn’t your local bike shop should stock them or be able to get one in for you. Park tools provides a tool for this job also, having a great little punch that will seat it just right. However if you are not going to get this tool you can carefully bang it into place using the stem cap bolt. This is not the ideal way to do it (which is using the Park Tool) however it does work.
Tap the nut down 2 or 3 centimeters (1 inch) past the top lip of the steerer. Do this so the headset top cap can do its job properly.
09 :: Installing Mountain Bike Forks

Now it’s time to slide your new fork into the bike. Clean and re-grease your headset bearing and reinstall your headset parts. Then slide your stem on.
10 :: Screw It
Screw the top cap bolt up until you feel resistance. If you feel resistance and there is no side-to-side movement when you rock your mountain bike fork, then your headset is adjusted correctly. If you are turning and turning the top bolt and the fork still rocks, there is an upside down piece somewhere – most likely a bearing race or a wedge. If this happens take it apart and try again. If you take it apart make sure you haven’t drawn the star nut out the top of the steerer.
Do you need some help Installing Your Mountain Bike Forks?
Need some help? Don’t understand a step or have a problem? Add a comment below and be helped by others who have come across your problem.

