Derailleur Adjustment – Your 7 step guide to getting your bike to shift properly

Getting your bike to shift properly is easy with this derailleur adjustment guide. It can be caused by anything from normal cable stretch to wear and tear or impact damage. It’s annoying when it happens but don’t worry – it’s easy to fix. Whether you are changing your cables or trying to get your existing set-up to work better – it’s all here in this 7 step guide.
01 :: Check Your Cables
Make sure your cables aren’t covered in some much crap as to cause the problem. This means use new or well-lubed cables only.
02 :: Remove Your Cable
Put your bike in the biggest ring and the biggest gear, then back the shifters off to the lowest they can at both ends (obviously don’t spin the pedals when doing this). This will create slack in the gear cables that will allow them to be easily popped out. With the cables out you can re-oil them.
03 :: Start Derailleur Adjustment – Set the Limit Screws
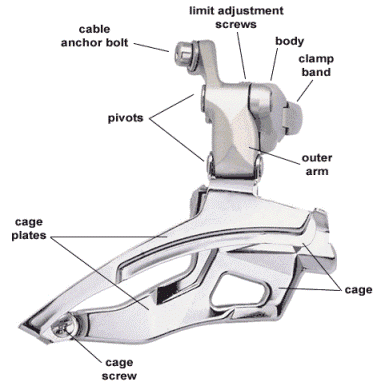
These 2 screws sit together on the back of the derailleur. They adjust the limit the derailleur can shift left (towards the low gear) and right (the other way).
These screws usually have either ‘L’ for low or ‘H’ for high on them. Most of the time the low (big) gear adjuster is on the bottom and the high on the top. If you can’t work out which is which then some quick testing should give you the answer.

To set these screw, check that at both ends of the gear range, the jockey wheel sits directly under the gear. If it doesn’t then tweak the screws until it does. Remember one screw will set on end and the other screw will set the other end.
Once these 2 babies are set, you shouldn’t need to touch them again unless the derailleur gets hit.
04 :: The Barrel Adjuster
With that part of derailleur adjustment complete and the limit screws set, wind the barrel (cable) adjuster on the back of the derailleur all the way in. Then back it out one turn so we have some leeway to work with. Assuming you have put a new cable in, loosen the Allen head bolt and pull the cable up reasonably tight through the cable mounting bolt. Tighten the locking screw up.
If it is a new cable it is sometimes worth speeding up the normal stretching process by pulling the cable by hand until it stretches a little bit. Once you shift up and down through the gears a few times with a new cable, loosen off the cable clamp and tension it up by hand a 2nd time. Tighten the locking screw back up and check your shifting.
05 :: Tension Adjustment
The bike should shift smoothly up from 1st gear (‘granny gear’) towards the taller gears, in all 3 front rings. If it shifts too slowly add tension to the cable by winding the rear barrel adjuster out a quarter of a turn at a time.
If it shifts a bit slow back-shifting towards 1st gear, there is a little too much tension on the cable. The 1 turn of free play we left in the barrel adjuster should stop us having to loosen the cable off again – wind the barrel adjuster in slightly to loosen the cable off.

06 :: Final Testing
Your derailleur adjustment is nearly complete. Take your bike for a test ride to get the adjustment just right. You might find the cables need a quarter of a turn in the tightening direction (out) but it should be pretty close.
07 :: Problems?
If your bike just won’t cooperate with you, it could be due to a bent derailleur hanger. Don’t worry it’s not the end of the world; it can often be corrected by your local bike shop using a special tool.


